Want to plan out your coolers designs before your COOLERSbyU™ Paintable Cooler arrives?

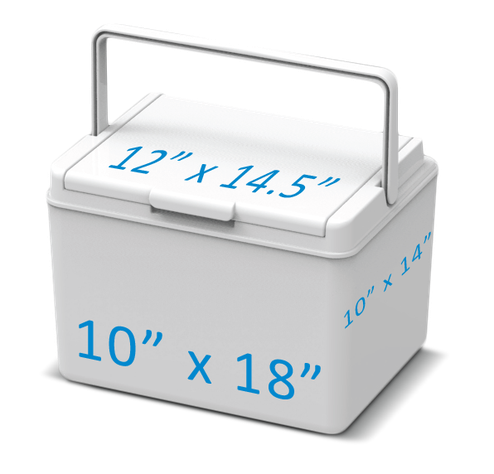
COOLERSbyU™ Coolers feature 5 large paintable areas:
Front/Back - 10” x 18”
Sides - 10" x 14”
Lid- 12” x 14.5”
COOLERSbyU™ Cooler Painting Tips
Visit our Youtube channel @COOLERSbyU for More Videos and Tips
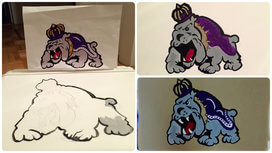
How to Trace a Design on your cooler
- Required Materials-
- White Tissue paper
- Printed Image or Font that you would like to trace
- Pencil
- Fine Point Sharpie
- Painters tape
- Step 1: Trace image or font on to tissue paper with pencil
- Step 2: Using Fine point sharpie, trace image onto cooler from the tracing paper. (note: depending on the sharpie and how hard you press, you may need to trace the image twice)
- The design will transfer to the cooler for easy painting!
- Alternatively: Use a projector to project desired artwork onto the cooler
- Trace the projected image onto the cooler with a fine point sharpie marker
- If you're a good free hand artist, sketch your design directly on the cooler with pencil or sharpies
How to Put Images on a Cooler Using a Water base Sealer, glue or finish like Mod Podge or Varnify
- Required Materials:
- Printed images of your Choice
- Mod Podge or Varnify
- Paint Brush
- Scissors
- Step 1: Print Images from computer
- Step 2: Cut images out with scissors
- Step 3: Apply layer of Mod Podge or Varnify to Cooler with paint brush
- Step 4: Stick down images down in wet Mod podge or Varnify
- Step 5: Allow time to dry
- Step 6: Cover images with a few layers of Mod Podge or Varnify (allowing each layer to completely dry before starting next)
- Optional: Paint over the images for added detail
How to Paint an Outer Space / Galaxy Background
- Required Materials:
- One Side Painted Black
- 2 paint brushes
- Sponge
- Paint (pinks, blues, purples work best)
- Cup of Clean water
- Step 1: Using dry sponge, Dab paint randomly around cooler Repeat with next color
- Step 2: Using black paint and sponge go back in and fill in some areas.
- Step 3: Once satisfied with steps 1 & 2 grab a clean wet paint brush. dip the paint brush in white paint. Use your finger on the bristles to "splatter" white paint around the background.
- Optional: Add your favorite alien or space ship!
How to Seal a Painted Cooler
- Required Materials
- Painted Cooler
- Varnify - Water based glue, sealer and finish
- A large Paint Brush or foam applicator brush We used a #3/4 flat brush for this video
- Step 1: (not shown) Paint your cooler with Acrylic Paint
- Step 2: After Painting, Wait at least 24 hours, so that the paint can dry.
- Step 3: Using your brush, Apply a layer of Varnify Sealer evenly across the entire painted area. Its important to work one side at a time.
- Step 4: Allow time for the Varnify to dry. It will turn clear as it drys.
- Step 5: Repeat Step 3 & 4 until desired gloss effect is achieved. We recommend applying 3 - 5 layers so a hard shell is formed.
- Step 6: Allow the final layer to dry for at least 24 hours before using!
General Cooler Painting Tips
- Any Acrylic will work great with COOLERSbyU™ coolers, But we recommend using either our line of Acrylic Paints or any brand new high quality matte finish Acrylic Paint for best results.
- Use Paint Pens/ Sharpies to draw fine lettering or touch up small areas.
- Use high quality brushes for best results, cheap or used brushes may leave behind fibers or streak lines. A good place to start is with COOLERSbyU 6pc Brush Collection.
- Do not water down your paint! It effects the paints ability to adhere to the cooler.
- make sure you clean your brush
- make sure when you are cleaning your brush you are not watering down the paint accidentally
- Depending on the quality of paint you are using, the first coat might appear semi-transparent. After it is dry apply the second coat. Repeat until desired opacity is achieved
- Make sure paint is fully dry before painting another coat
- Acrylic paint will be dry to the touch (in most conditions) in 15-30 minutes but will not fully cure for up to a month.
- NEVER use a blow dryer to speed up the drying process. Direct heat can cause paints to bubble/crack/peel
- NEVER paint in direct sunlight ( or in the sun). Direct sunlight can cause paints to bubble/crack/peel
- NEVER paint next to a radiator or heat source. Direct heat can cause paints to bubble/crack/peel
- ALWAYS seal the cooler to preserve your design
- We recommend using Varnify, Mod Podge, Famowood or Krylon Clear Sealer
- Make sure the sealer you choose is waterproof if you plan on using the cooler where it might get wet
- Always wait at least 24 hours after painting to seal your cooler to ensure the paint is completely dry.

Buy a ready to paint cooler now!
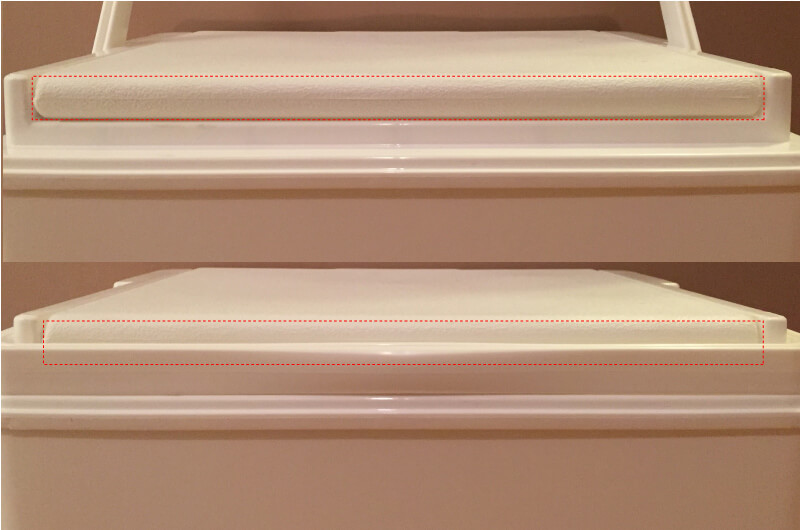
There is one spot on the cooler that we do not recommend painting; The red dotted box in the below image points out the high friction area between the handle, lid and body of the cooler. This area if not sealed properly is likely to rub with every day use, it is best for beginners to leave this spot blank.

